Read my blog
Git, Gitter, Gittest!
- A beginer's guide for Git & GitHub
All the excitement and hype over Git tend to make things a little muddy. You all may have many questions, such as, can you only use Git to share your code with others, or can you use Git in the privacy of your own home or business? Do you have to have a GitHub account to use Git? Why use Git at all? What are the benefits of Git?
Is Git the only option ?
So forget what you know or what you think you know about Git and let's take it from the beginning.

What is Git?
Git is, first and foremost, a Version control system (VCS). There are many version control systems out there: CVS, SVN, Mercurial, Fossil, and, of course, Git.
By far, the most widely used modern version control system in the world today is Git. Git is a mature, actively maintained open source project initially developed in 2005 by Linus Torvalds, the Linux operating system kernel’s famous creator. A staggering number of software projects rely on Git for version control, including commercial projects as well as open-source.
About Version Control
So now, let’s see what exactly git is. Git is a distributed version control system. So, What is a Version Control System?
A version Control system is a system that maintains different versions of your project when we work in a team or as an individual (system managing changes to files). As the project progresses, new features get added to it. So, a version control system maintains all your different versions of your project for you. You can roll back to any version you want without causing trouble to you for keeping versions distinct by giving names to it like HelloWorld, HelloWorld_v_1, HelloWorld_v_1.1, etc.
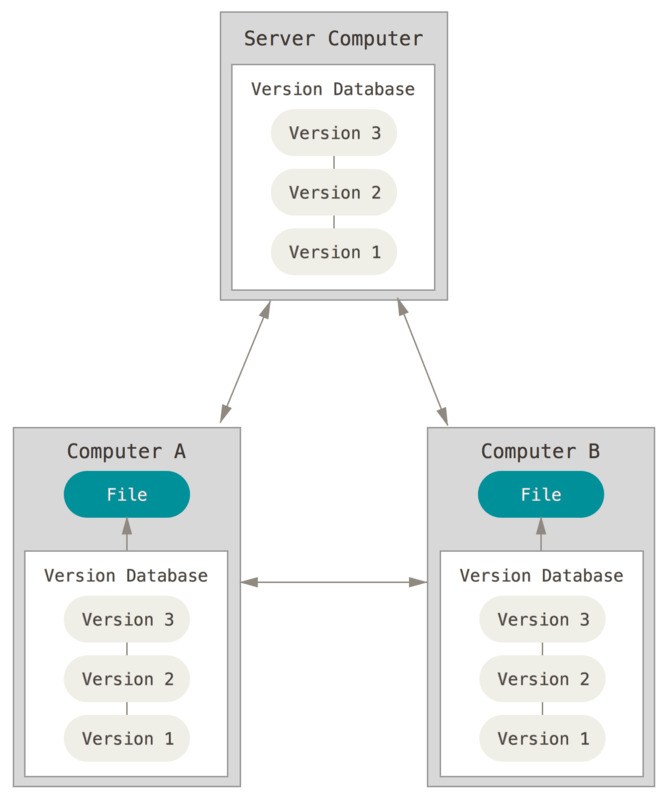
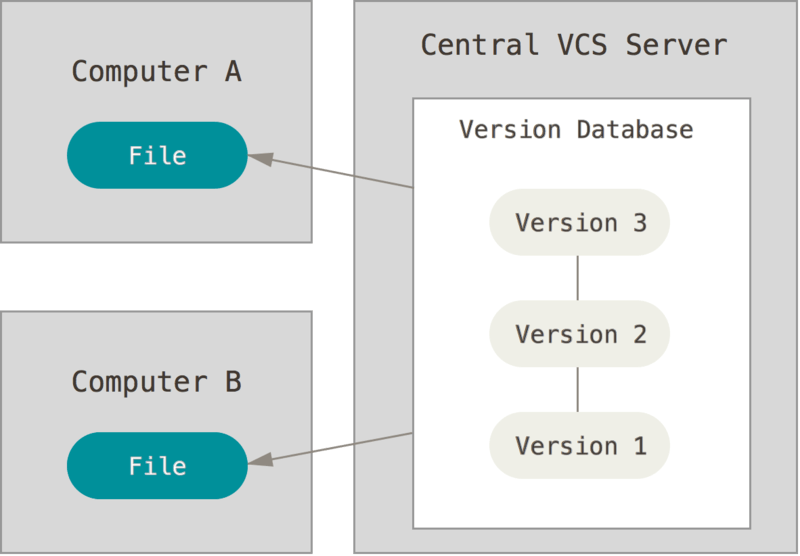
A distributed version control system means every collaborator (any developer working on a team project) has a local repository of the project in his/her local machine, unlike central, where team members should have an internet connection to update their work a principal central repository. So, by distributed, we mean: the project is distributed. A repository is an area that keeps all your project files, images, etc.
Git Repository Structure
- Working directory: This is your local directory where you do the project (write code) and change it.
- Staging Area (or index): This is an area where you first need to put your project before committing. The staging area is suited for code review by other team members.
Local Repository: This is your local repository where you commit changes to the project before pushing them to the central repository on Github. Local Repository is what is provided by the distributed version control system. Local Repository corresponds to the .git folder in our directory.
- Central Repository: This is the main project on the central server, a copy of which is with every team member as a local repository.

Now, Let me tell you that you can use Git GUIs (Graphical User Interface), which is super-easy, But then you won't be doing justice to your Programmer's Pride. Well, in that case, we use Command Line Git.
P.S. It's not just about Programmer's Pride, and Command-Line Git also provides much control over various functions, which we will discuss ahead. So, Let's Get Started.
Step 0: Installing Git and Creating a GitHub account
So, first of all, you need to install Git on your system. You can get the Installation Guide here. Now, Create a free account at GitHub.
Verify installation
Want to check if Git installed successfully or not?
- Verify if Git is installed by using the following command in the Git Bash terminal

This command will return the version of git in floating digits, which verifies that Git has been installed successfully.
Step 1: Understanding Git and GitHub -
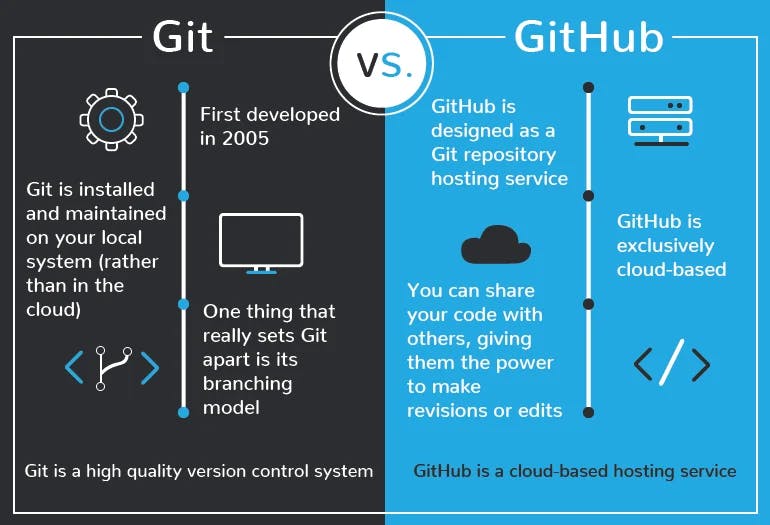
Git is a free and open-source distributed version control system designed to handle small to substantial projects with speed and efficiency. It is used to track all the changes that you made to your code and revert to a particular version if you want to. Git also makes collaboration more comfortable, allowing changes by multiple people to all to be merged into one source.
On the other hand, GitHub lets you store your code on a cloud server easily accessed by other programmers online. It’s an online database that allows you to track and share your Git version control projects outside your local computer/server.With a basic knowledge of git and GitHub, let's move forward.
Step 2: Setting up our identity -
The first and foremost step after installing Git is setting our name and email address. Because every Git commit uses this information, and it’s immutably baked into the commits we start creating:
Step 3: Creating a Local Git Repository -
A Git repository is the .git/ folder inside a project. This repository tracks all changes made to files in your project, building history over time.
First, open up a terminal and move to where you want to place the project on your local machine, and right-click to open Git BASH Here.
To initialize a git repository in the root of the folder, run the git init command:

Step 4: Creating and adding a file to Staging Area-
Before we add a file, let's see the basic workflow :
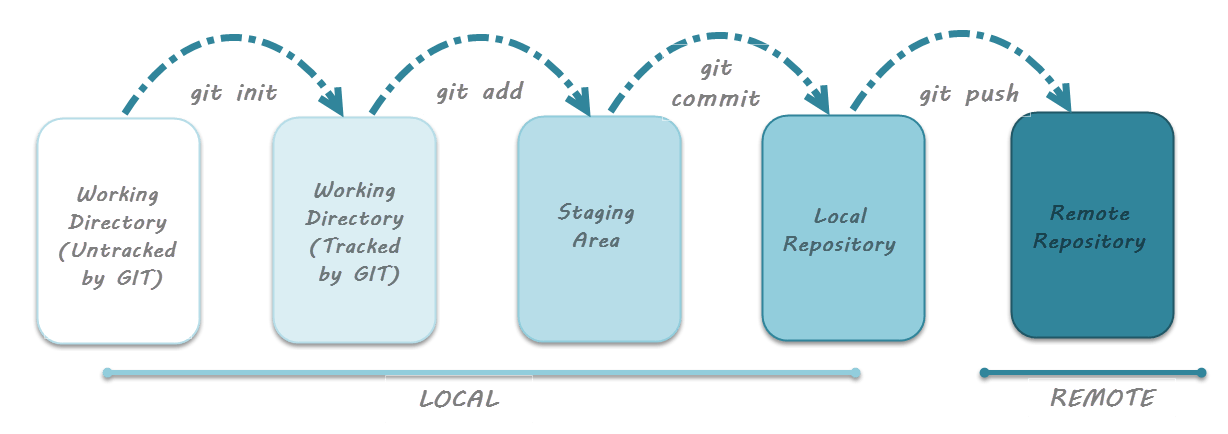
So, in order to proceed with this tutorial, create a file named index.txt. This file is currently in the working area. Now we will add this file to the staging area using the git add command, followed by the git commit command to commit the changes:
Use of commit message :
Commit messages are very important in the long run. Later if you want to revert back to a certain version, the commit message makes it easier for us to remember the version.
Step 5: Checking the Status of our files:
We use the git status command to check which files are in staging area, and which are untracked file:

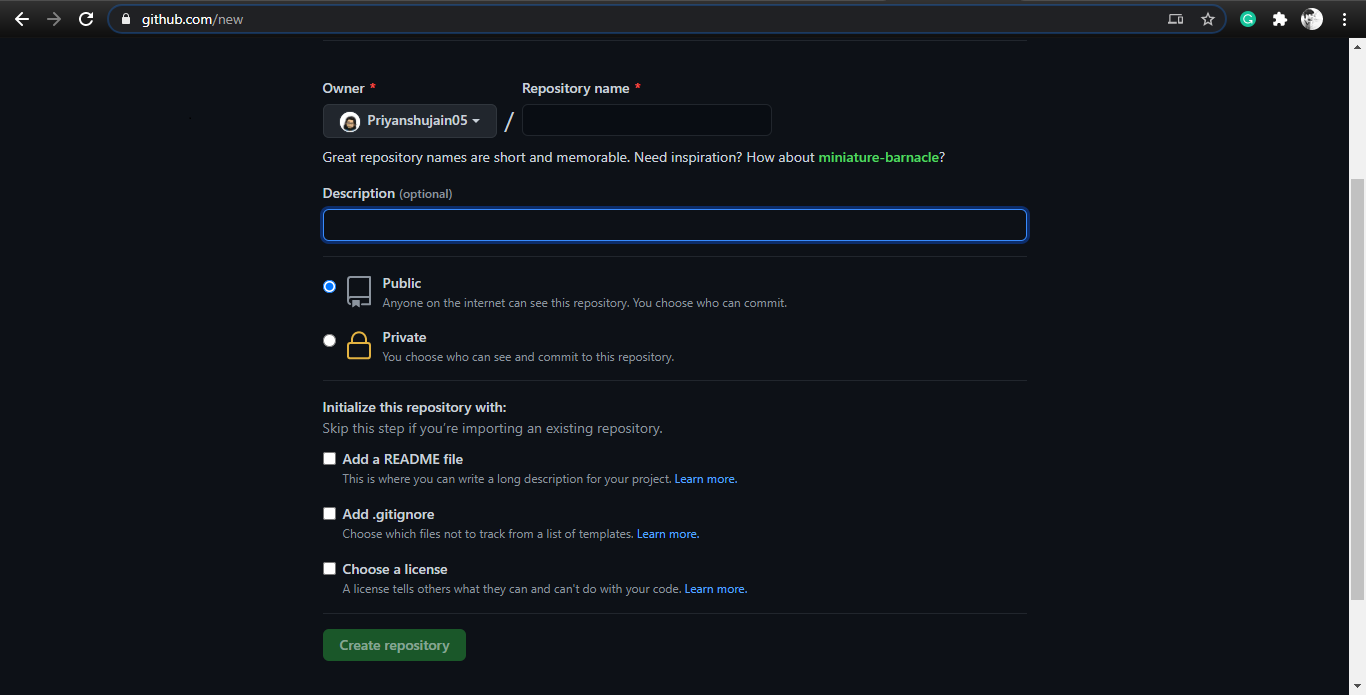
Step 6: Creating a new repository on GitHub -
This step is really simple and self-explanatory. We just have to open our newly created GitHub account. And then Click on NEW Repository. You can choose the name of your repo, the accessibility and provide some description. Click Create Repository and voila, your repository is created!
Step 7: Using the Git Push command :
The git push command is used to upload local repository content to a remote repository. Pushing is how we transfer commits from our local repository to a remote repo. It's the counterpart to git fetch, but whereas fetching imports commits to local branches, pushing exports commits to remote branches.
To push our local repository, we connect our Git to the GitHub Repository :

You have successfully learned :-
- How to create a new repository.
- the basic terminologies of git like untracked files, staging area etc.
- the basic commands of Git Command line.
- How to push your repository to GitHub.


About The Author
I am a final year under-grad Computer Science student at UIT,RGPV,Bhopal. I’m eager to learn, proactive, meticulous and I love nothing more than working with people, building amazing software and solving technical problems.I would like to work in collaboration.
Author
Reply
Leave a comment